
Yay! After days of waiting, I finally have my new concrete countertop installed in my bathroom. Last week I alluded to "something curing" in my garage. Well, this was it.
Last week, I shared the latest chapter in my bathroom make-over, darkening the vanity cabinets without stripping them. Actually, I've been dying to replace the counter and sinks in my master bath for a long while and once I decided to DIY the countertop, I figured it was a great time to update the cabinets too. I didn't hate the way the old countertop and sinks looked, but they were a "free section" score and were in pretty rough shape. You can't see in photos, but they were scratched to pieces and had some pretty nasty spots that would NEVER come clean no matter how I scrubbed.

One night while getting ready for bed, I suddenly decided I needed to try my hand at concrete counters. I'm not going to pretend I am the first person to do this. Before I started, I found a super helpful tutorial by Imperfectly Polished. I highly recommend reading through their process if you are considering DIYing concrete countertops.
Although there are a handful of tutorials out there, there were a few steps that I found difficult to find explained. Also, I learned a few tips along the way, so I thought I'd share those elements
The biggest problem I hadn't see addressed was what to do about a sink opening. None of the tutorials I read really discussed how to accommodate a drop-in or under-mount sink. I found a few education videos meant for professionals and learned what I needed was a knock-out.
 |
| Alena Shishkova |
Find a piece of rigid foam insulation a bit larger than your sink. You can find the foam in the stucco section of Home Depot and Lowe's and is really cheap. Like $5 for a half sheet. If you are using a new sink, you will need the paper template that comes with your sink. If you are using an old, salvaged sink that has been sitting in your garage for 3 years, then you need to trace around the outside.

For reference, I suggest tracing the holes for the faucet as well. Next, you need to shrink the shape so the sink has something to sit on and doesn't fall through the hole. On my sink, I had about a 1" lip of clearance, so I simply free-handed a shape 1" smaller than my sink tracing.
Cutting the foam is a snap. I found a jigsaw set to its slowest setting cut through the foam like butter.

If you have any funky edges, you will want to sand those down to get a smooth edge. If you are doing a drop-in sink, this step is extra important.
To cover the raw edges of foam, I ran a strip of packing tape around the entire perimeter. If you are doing a drop-in sink, I may even suggest a couple layers of tape, to ensure a nice, slick edge. For a under mount sink knock-out, you may even want to use a release agent .
.

Now, its time to attach the knock-outs to the countertop form. The form is pretty simple, a frame of melamine screwed together and sealed with silicone caulk.
Measure your vanity, do a little geometry, and figure out where the openings need to be. Once they are marked, glue on the knock-outs with more silicone caulk, and secure with a couple screws. Then, run a bead of caulk around the outside of the knock-out, and smooth it, creating a water tight seal to the form.


Just like getting your hair colored, the processing time is the hardest part. After tamping, screeding, and vibrating the form, I covered it in plastic (to lock in moisture and slow the drying time. slower curing = stronger concrete) and let it cure for a week. In fact, we were up camping when the concrete hit the 7 day mark, so it actually sat for 10 days.
To remove the forms, pull off the protective tape and remove the screws. Then, carefully flip the form over and pry apart the melamine. Make sure to not use any tools on the "green" concrete.

Now form-less, the knocking-out part comes in. Use a utility knife and cut the foam into a few large pieces. Make sure to cut all the way through. The, you can easily pry the foam out of the opening.

Here's how the countertop looked fresh out of the form. I put it up on sawhorses so I could finish it. This thing is heavy as crap! Moving it is definitely a two-man, or a one-olympic-shot-putter job.

I chose to keep the natural, grey color. I wanted my countertops to look, well, like concrete. I'm digging the industrial look right now plus, sealed concrete is dark gray, which I'm also digging right now. Concrete is so versatile! You can make it look like almost anything and in any style. If you are so inclined, I've seen some beautiful faux stone finishes on concrete.
To seal them, I used the only concrete sealer I could find at Home Depot in "natural finish". If you google acrylic concrete sealers, you will find lots of good quality options. I just didn't want to wait. It seemed to work really well. I rolled on 2 coats, and then rubbed and buffed 2 coats of wax. If you plan to prepare food on your counters (I don't know about you, but I don't often find myself making a sandwich in the bathroom) then you need to be sure to use a food-safe wax.
The next day, I had the husband help me schlep the counter into place. We secured it to the cabinets with a thick bead of silicone caulk. Then, we dropped in the sinks, and installed the new faucets.

Speaking of faucets, aren't the gorgeous?! They are the

I'm really happy with the industrial look of the concrete. Its exactly what I was hoping for. I love the contrast between the sleek cabinets and shiny hardware next to the rustic concrete.
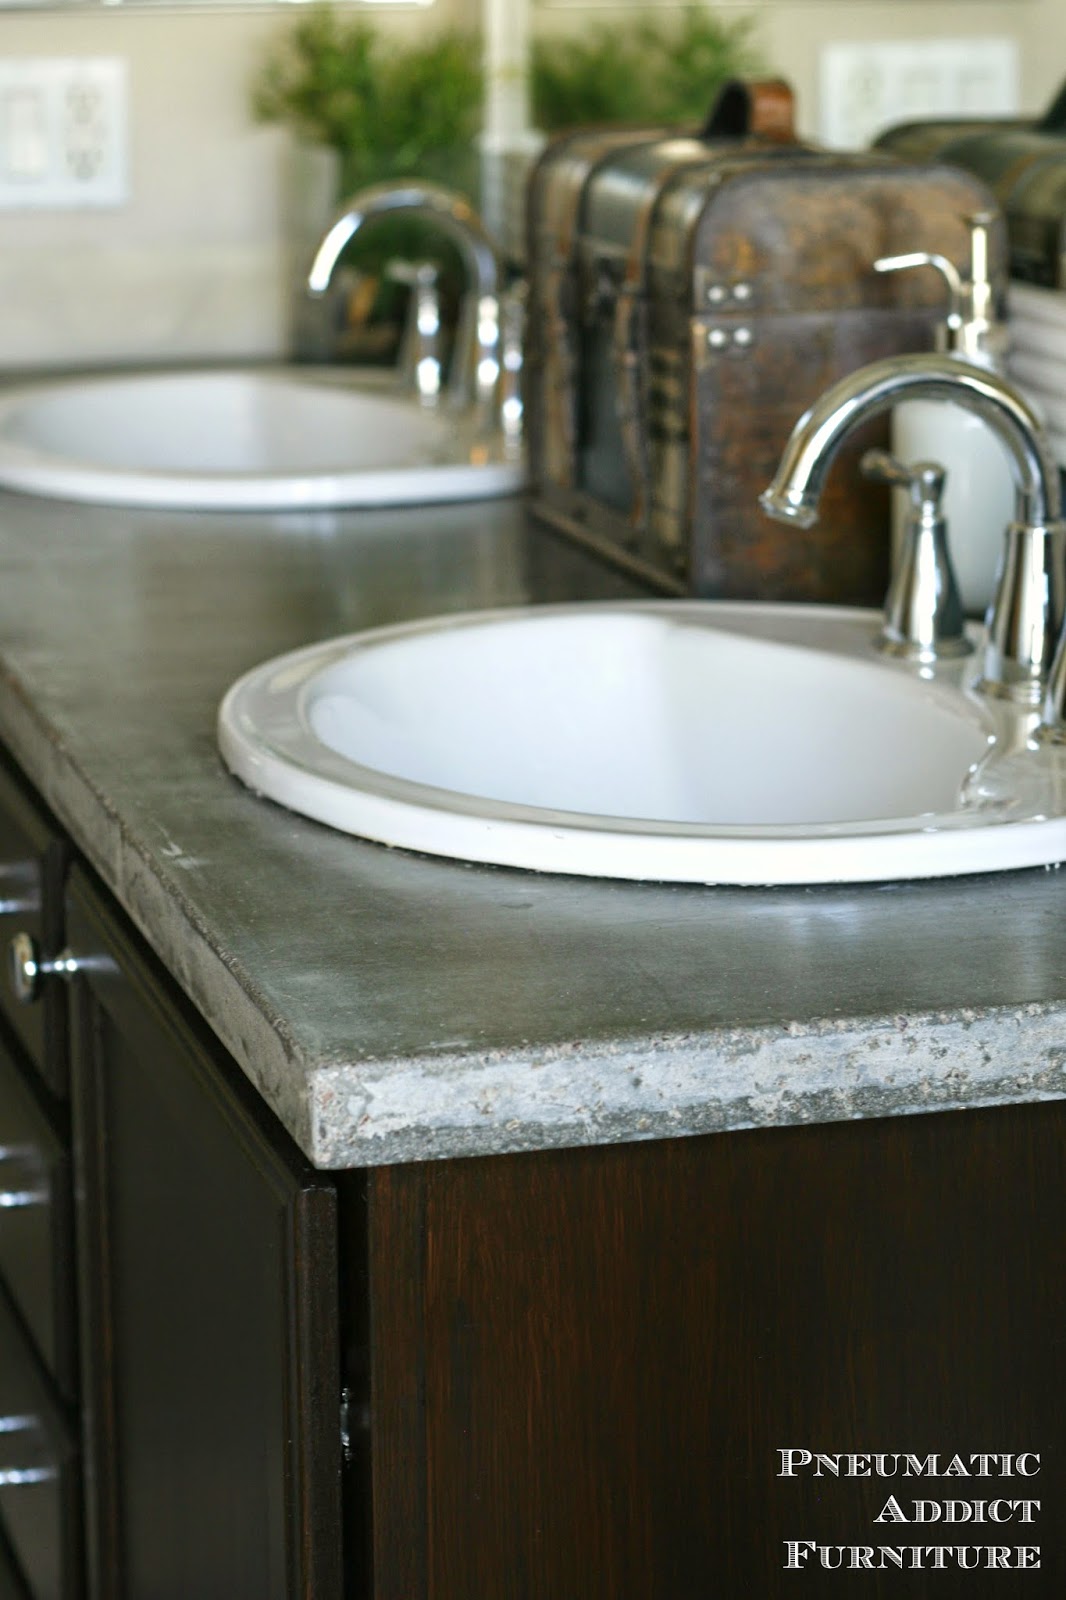
There are several little imperfections, and it's great. In this shot, you get a little glimpse at my new crush, A.K.A. cabinet hardware from D.Lawless Hardware.

 I was hoping for variations in color, and my countertop happily delievered. If you want a solid colored surface, you can add concrete pigment to change and even out the color.

Things I learned from this process:


If you dig the Mid-Century/Industrial look, check out my:
+ Mid-Century Industrial Storage
+ World Market "Aiden" Coffee Table knock off
+ Zinc Top Coffee Table
Linking at:
Remodelaholic


For reference, I suggest tracing the holes for the faucet as well. Next, you need to shrink the shape so the sink has something to sit on and doesn't fall through the hole. On my sink, I had about a 1" lip of clearance, so I simply free-handed a shape 1" smaller than my sink tracing.
Cutting the foam is a snap. I found a jigsaw set to its slowest setting cut through the foam like butter.
If you have any funky edges, you will want to sand those down to get a smooth edge. If you are doing a drop-in sink, this step is extra important.
To cover the raw edges of foam, I ran a strip of packing tape around the entire perimeter. If you are doing a drop-in sink, I may even suggest a couple layers of tape, to ensure a nice, slick edge. For a under mount sink knock-out, you may even want to use a release agent
Measure your vanity, do a little geometry, and figure out where the openings need to be. Once they are marked, glue on the knock-outs with more silicone caulk, and secure with a couple screws. Then, run a bead of caulk around the outside of the knock-out, and smooth it, creating a water tight seal to the form.
One extremely clever tip I picked up along the way involved a bit more packing tape. Can you imagine how hard it would be to remove screws smothered in dried concrete? So, before I poured the concrete, I went around and covered any screw heads with a little piece of tape.
Here's the photo to prove that I actually mixed and shoveled the concrete myself. Admittedly, I had a lot of help from the husband. Not that mixing and pouring concrete is particularly difficult, but it requires some serious muscles and is time sensitive. You will need a helper.
Notice the hardware cloth and rebar? I've read several arguments for and against how necessary steel reinforcement is in countertops. The rebar and hardware cloth provide tons of structural strength and as my husband always says "When in doubt, build it stout".
Just like getting your hair colored, the processing time is the hardest part. After tamping, screeding, and vibrating the form, I covered it in plastic (to lock in moisture and slow the drying time. slower curing = stronger concrete) and let it cure for a week. In fact, we were up camping when the concrete hit the 7 day mark, so it actually sat for 10 days.
To remove the forms, pull off the protective tape and remove the screws. Then, carefully flip the form over and pry apart the melamine. Make sure to not use any tools on the "green" concrete.
Now form-less, the knocking-out part comes in. Use a utility knife and cut the foam into a few large pieces. Make sure to cut all the way through. The, you can easily pry the foam out of the opening.
Here's how the countertop looked fresh out of the form. I put it up on sawhorses so I could finish it. This thing is heavy as crap! Moving it is definitely a two-man, or a one-olympic-shot-putter job.
I chose to keep the natural, grey color. I wanted my countertops to look, well, like concrete. I'm digging the industrial look right now plus, sealed concrete is dark gray, which I'm also digging right now. Concrete is so versatile! You can make it look like almost anything and in any style. If you are so inclined, I've seen some beautiful faux stone finishes on concrete.
To seal them, I used the only concrete sealer I could find at Home Depot in "natural finish". If you google acrylic concrete sealers, you will find lots of good quality options. I just didn't want to wait. It seemed to work really well. I rolled on 2 coats, and then rubbed and buffed 2 coats of wax. If you plan to prepare food on your counters (I don't know about you, but I don't often find myself making a sandwich in the bathroom) then you need to be sure to use a food-safe wax.
Speaking of faucets, aren't the gorgeous?! They are the
Danze Eastham Widespread Bathroom Faucet in chrome and they were generously provided by National Builder supply. I was blown away by their quality! Made me think of that part in Jurassic park, "Are they heavy? Yeah. Then they are expensive."
I've worked with Supply.com before and there is a reason, they're the best. If you are looking for a new faucet, door hardware, lighting, or pretty much anything home related, you've gotta check them out. Best selection I've ever seen!
I'm really happy with the industrial look of the concrete. Its exactly what I was hoping for. I love the contrast between the sleek cabinets and shiny hardware next to the rustic concrete.
There are several little imperfections, and it's great. In this shot, you get a little glimpse at my new crush, A.K.A. cabinet hardware from D.Lawless Hardware.
Things I learned from this process:
- Even if it says "great for counter tops" on the bag, I would recommend using a specific countertop concrete mix, especially if you are looking for a "flawless" finish. Sure, the stuff I used it strong enough for countertops, but I was shocked how large the aggregate was! It made it pretty hard to get a pretty surface.
- DON'T USE CLEAR CAULK! It was almost impossible to see it once applied and it was really hard to make sure my form was sealed all the way around. Just buy a tube of the black stuff and make your life easier.
- Its worth the extra money to buy a concrete additive/ water reducer. I found it in the concrete section at Home Depot, next to the trowels. Not only does the additive reduce the amount of water needed (making the concrete stronger) it really helps to make the concrete more workable.
- Yes, you can use regular ole sandpaper to smooth the surface. You don't have to use diamond grit and a special sander. You'll just go through sandpaper much more quickly.
I realize the industrial look might not be for everyone, but I think there is a concrete countertop for just about anyone. What do you think? Are you ready to DIY some counter tops?
Let's be friends! Follow along, so you never miss a post
*This post contains affiliate links and sponsored product. All opinions are 100% mine and have not been influenced.
If you dig the Mid-Century/Industrial look, check out my:
+ Mid-Century Industrial Storage
+ World Market "Aiden" Coffee Table knock off
+ Zinc Top Coffee Table
Linking at:
Remodelaholic


Amazing! How did you wait the 10 days without going crazy? LOL. I wouldn't have concrete myself, because I have nothing industrial, but you did a fabulous job.
ReplyDeleteGorgeous!!! I'm loving the whole look from the cabinet to the concrete to the faucets to the knobs! Great job Elisha!!
ReplyDeleteThat looks so awesome! I love them!! And the faucets are beautiful too. I have always been scared to do concrete, but your post is making me change my mind!
ReplyDeleteThey look awesome! Great job for just going for it, it was worth it! I love the variation in the color on the top, mmmm pretty! Pinned, for if I ever decide I need to do this.
ReplyDeleteThis is fabulous. Your entire finished bathroom is gorgeous. I love the mirror and the darker cabinets, too.
ReplyDeleteAwesome job!
ReplyDeleteYou go girl!
Catherine
What a great job.. Not sure I would use it in my bathroom but it looks amazing..
ReplyDeleteI have wanted to try this, just not sure where I want it! Yours look great!!!
ReplyDeleteWow, your concrete countertop is totally awesome! I love the natural, earthy feel. And the mix of elements makes for a much more interesting room. Nicely done!
ReplyDeleteThis is just great. I love the look, and the whole bathroom looks wonderful. Thanks for the inspiration, what a brain storm you've given me.
ReplyDeleteWow. It's stunning and you are amazingly talented.
ReplyDeleteLove love love this! I've been looking into doing a concrete table top. Excellent tutorial full of info! Thanks so much!
ReplyDeleteThey turned out beautifully!! I love the texture and organic feel.
ReplyDeleteI have been sitting on the fence about trying this technique. I think this was the push I needed to try it. Love it.
ReplyDelete