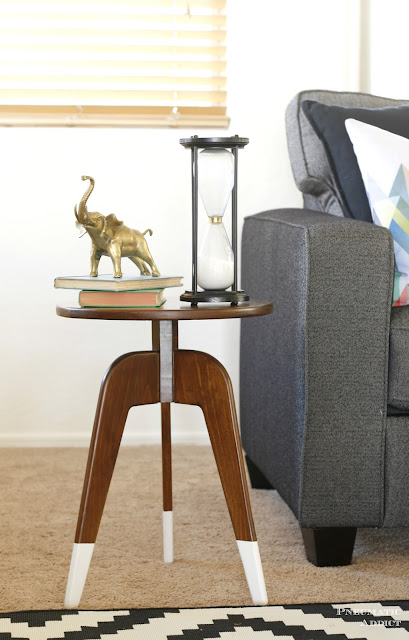
I've always had a love for hourglasses. My dream thrift store find would be an antique hourglass, but I'm not holding my breath till that day comes. In the meantime, I created my own DIY hourglass from a couple empty soap bottles and a few supplies from the craft store.
Materials List:
- (2) *Method brand hand soap bottles
("limited edition" bottles work best)
- (2) *5" diameter wood plaque
- (8) *wood button plugs
- (1) *replacement wine cork
- *fine craft sand
- *1/4" x 48" wood dowel
- *gold washi tape
- *clear multi-surface glue
- *spray paint
1. The first thing I did was to pull the cork off the plastic base, and drill a 1/8" hole in the center.
2. I emptied the soap from the bottles (and used it in my decorative soap pumps), removed the labels, and washed the bottles thoroughly. The "limited edition" soap bottles work best because the label is printed on a plastic wrapper, instead of printed on the bottle itself.
Once the bottles were dry, I used a small hacksaw to cut off the threaded part of the neck. I then used a paper funnel to fill one of the bottles about 3/4 full of sand.
3. I then inserted the cork and connected the bottles together.
4. To cover the exposed necks and cork, I cut a strip of gold washi tape about 3/8" wide and wrapped it around the bottle necks.
6. I marked each corner of the paper, then drilled a 1/4" hole through the plaque.
7. I took one one pre-drilled plaque and flipped it over. I then glued a button plug over each hole.
7. I cut four, 11 1/4" lengths of 1/4" wood dowel with my small hacksaw.
8. Once the glue on the button plugs was dry, I flipped the plaque over. I applied glue to the ends of each dowel and inserted them into the open holes. At this point, all the wood parts received 2 coats of paint, including the second plaque and four remaining button plugs.
9. Once the paint was fully dried, I centered the hourglass on the frame and attached it with a blob of glue on the bottom.
10. I added another blob of glue to the top of the hourglass, and topped the frame with the second plaque. I covered the holes with more glue and button plugs, finishing the whole assembly. Once the glue was fully dried, I had my finished hourglass.
I finally have a traditional looking hourglass to display! I've asked everyone who has come over what they think, and no one has guessed that I made it from old soap bottles.
I'm digging the classic black and white scheme, but you could make one with any colors you'd like.
I timed the sand, and it runs for about 45 minutes. If I really cared, I could play around with the amount of sand and the size of the cork hole to get a specific time.
Ready to make your own?! Pin the image below and save the idea for later.
*This post contains affiliate links.
Let's be friends! Follow along, so you never miss a post


I wouldn't be able to tell it was made from plastic bottles, love this!
ReplyDeleteThis is genius. Like you, I've always been fascinated by hour glasses. It's always been in the back of my mind to explore creating one, but now, you've shown us all how! Thank you!
ReplyDeleteThis is great! Thank you!
ReplyDeleteThat is so clever! I love it-I'm tucking that idea away for later.
ReplyDeleteThis is just awesome, Elisha! I love hourglasses and have given them a lot as gifts - never thought about making one! Visiting from Fluster Buster and pinning. Thank you for sharing and have a great week!
ReplyDeleteLove this! What a genius idea! Thanks for sharing your tutorial!
ReplyDeleteJill
Doused In Pink
Love it! Very, very creative! Thanks for sharing!
ReplyDelete