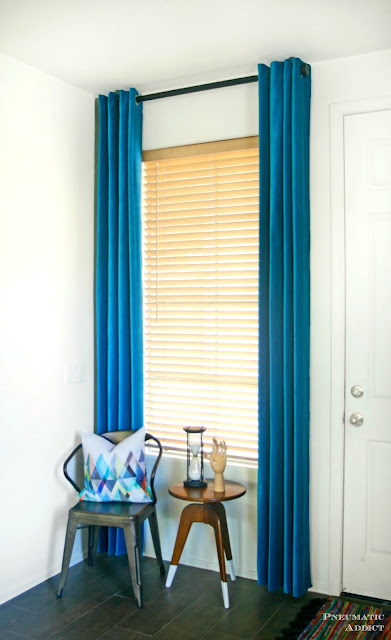
My plan is to stick with simple white walls in the new house, so I decided I need to introduce some color. I fell in love with the Sanela velvet curtains from Ikea in the color "dark turquoise". Our house has 9ft ceilings, so the fact that the Sanela panels comes in extra long lengths sealed the deal.
With my curtains picked out, I started brainstorming ideas for modern looking curtain rods and finials that I could make myself. I've gotta say, I'm really happy with the simple, inexpensive design I came up with! Once again, I partnered with my friends at Rockler to show you how its done.
Materials List:
- *1-3/8" wood dowel
- *2-1/2" flat wood toy wheels
- *1-3/8" curtain rod brackets
- *1-1/2" #10 wood screws
- 1/4" flat washers
- *#10 screw head covers
- *spray paint
You may have noticed a few items on the materials list that seem unusual.
That hockey puck looking thing in the photo above becomes a finial. Its not actually a hockey puck, but a 2-1/2" wooden toy wheel, painted black. I found a bag of *20 wheels online, so I'll have plenty of finials for the whole house.
1. The first step I took was to mount 1-3/8" curtain rod brackets to the wall. I found mine at Lowe's, but you may have an easier time getting brackets online. Using a magnetic bit extension made driving the screws much easier.
2. Once the brackets were mounted to the wall, I measured the distance between, added 14" and had the length to cut my wood dowel/curtain rod.
I had some old closet rod in my scrap pile, so I used that. If you don't have a bunch of wood rods laying around, you can find 1-3/8" diameter in the moulding section of the hardware store for around $1.40 a foot.
3. With the rods cut down to length, I needed to drill holes in each end to attach the finials. Finding the center of a circle can be a challenge, so I ordered a Blokkz centering punch.
I lined up the tool on the end of each dowel,
then tapped the metal punch to make a small hole, perfectly in the center.
4. With the center marked, I used a 1/8" drill bit to pre-drill a 1" deep hole. At this point I gave the rods and finials a couple coats of satin black spray paint.
5. Once the paint was dry, I stacked a finial on the end of a rod, followed by a washer, and drove a 1-1/2" wood screw, tying them together.
6. To cover the screw head and to finish off the finial, I tapped in * a black screw head cover
I added the curtain panels before attaching a finial to the other end. At that point, I hung the rods on the brackets and was done!
I've added curtains to all the windows in my living room so far and I'm working my way around the house. I love that I can make the rods in any length I need without spending a fortune.
What do you think? Do you have some naked windows that could use DIY curtain rods and modern finials? Pin the image below to save the idea for later!
*This post contains affiliate links and sponsored content paid for by Rockler Woodworking and Hardware. All opinions are my own and have not been influenced.
Let's be friends! Follow along, so you never miss a post


Clever using the wheels and so versatile.
ReplyDeleteI like the modern look of the finial. :)
Thanks for the tip on the centering punch-a very cool tool to have
ReplyDeleteExcellent tutorial, this would have taken ages
ReplyDeleteDelores Ensley
http://homedecor.guide