*This post is sponsored by DAP Products and contains affiliate links
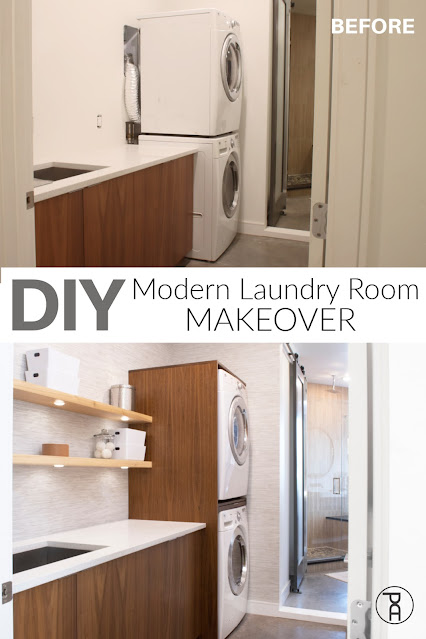
Remember how we built our modern dream home last year? (check out the full #BuildingModernOnABudget video series HERE). While we were building, we focused on getting the main living areas, like the kitchen and bathrooms complete. Other areas, were left for another day. Well, we've been in the house for about a year, so I decided it was finally time to tackle the laundry room. Here's how the space looked before:

There was nothing particularly wrong with it. It was just boring and unfinished. During construction, we installed a 6' stretch of the same Ready To Assemble walnut cabinets and quartz countertops that we used in the kitchen. We decided to stack our front loading washer and dryer and squeeze them into the corner. Other than that, our laundry room was basically a blank space.
You'll definitely want to check out the full build video! I got to try two cool new techniques on this project. Keep scrolling to learn more.
First new technique: Wood Veneer
I've always wanted to try applying wood veneer to something. I think it's super cool that you can take an inexpensive material like MDF or even particle board, and make it look like expensive hardwood.
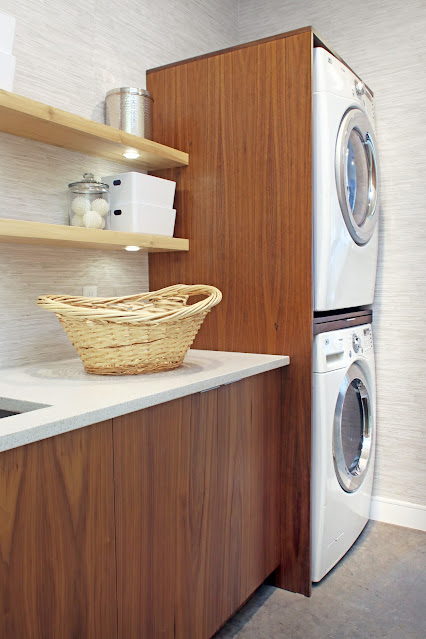
I decided to build a custom paneled surround to house the washer and dryer. After doing quite a bit of research, I found out that most cabinet makers use MDF (Medium Density Fiberboard) to create large, flat panels like the what I had in mind. I also learned that the traditional adhesive used to attach veneer is DAP Weldwood Contact Cement.

There's a reason why Weldwood Contact Cement has been the standard for decades. It offers flexible, permanent adhesion on wood, leather, paper, plastic, rubber and more. Most types of glue become brittle and shrink as they cure, which would cause a major problem when attaching a delicate material like veneer.

Contact cement is a bit different than most adhesives. For example, instead of spreading glue and quickly working to join your pieces together as fast as you can, contact cement is applied thinly to both surfaces and allowed to dry.

Once dried, the two surfaces are pressed together, creating a permanent bond. To work out trapped air bubbles between the MDF and wood veneer, I used a tool called a J-roller.

I used paper-backed walnut veneer on my panels with the goal to match the existing cabinets. I was surprised how easy it was to work with. I could easily trim off excess with a utility knife. It reminds me of iron-on edge banding.

Second New Technique: Under Cabinet Lighting
I wanted to add a couple floating shelves above the cabinets to provide storage for everyday items like dryer sheets.

I've built a few different floating shelves in the past. I used a hidden cleat-style installation in our upstairs bathroom, but installed the floating shelves in our kitchen using the same hardware as the laundry room.

Making the shelves it pretty straightforward. Basically, I planed and ripped 8/4 poplar boards to my desired size, and then drilled 6" deep, 1/2" diameter holes to accommodate simple floating shelf brackets. In order for the shelves to sit flush against the wall, I needed to rout shallow mortises for the rectangular bracket plates.

But like I said, I've already made lots of floating shelves in my day and I'm talking about new techniques. The second new thing I got to try in the living room was adding under cabinet lighting to my floating shelves.

I found inexpensive LED puck lights on Amazon, which function together and can be controlled with a single remote. I decided to drill three, 2-9/16" diameter holes (using this massive forstner bit) in the underside of each shelf to hold the lights.

If I had been smart, I would have installed the lights into the shelves before hanging the shelves on the wall. I was in a rush to get the shelves up and realized as I was finishing the laundry room, I created a need to attach the lights, upside down. Yikes!
Cue the DAP RapidFuse Ultra Clear.

If you have been here for long, you know that I LOVE me some RapidFuse! RapidFuse Ultra Clear is a super strong, quick-setting adhesive that cures in as little as 30-minutes.

That means all I had to do was to remove the backs off the lights, apply a little RapidFuse, press the backs into the cavities in the shelves, and hold them in place for 30 seconds.

I'll admit, after only spending $16 for six lights, I was skeptical that they would all work. Thankfully, they work like a charm!

The Reveal

What do you think? I am in looooooove!

Notice that strip of walnut between the washer and dryer?

It's actually a pull-out shelf I designed to hold laundry baskets. I really like the extra space we got from stacking our washer and dryer, but I hated trying to unload clothing from the dryer one handed. The shelf makes moving a full load of heavy clothes much easier.

I also designed the pull-out shelf to double as a drying rack. Maybe I will start to hand wash my delicates like I'm supposed to.
Don't worry, I've designed printable building plans if you're interested in building your own. I'll be publishing those later this week.


My biggest fear with the laundry room makeover was the new walnut panels not matching the existing cabinetry. I think I got pretty darn close. I go into detail about the finishing process in the YouTube video, so don't forget to check it out.
What do you think? Was the makeover worth it?
If you like that, you'll love these ideas:


Let's be friends! Follow along so you don't miss a thing!


No comments